Goodbye, thank you and Design Team Call

We look forward to welcoming some new CricutDIVAs to the team!

Will one of them be you??

Die Cut Darla, your CricutDIVA blog admin here with you today.

Today I am posting because we are saying goodbye to 3 wonderful CricutDIVAs and looking for some new members to be a part of the Cricut-DIVA design team!!

You may have noticed that it’s been quiet here lately and that is because our original design team’s term ended at the end of September. I am happy to tell you that most are going to stay with us for another term. Three of our wonderful design team members however are saying farewell.

Beth, Lori and Sierra you will be greatly missed and I wish you the absolute best of luck for your future. You are an absolute pleasure to work with and you are welcome to guest design here or re-join the cricut-DIVA team any time in the future.

I would also like to take a moment to publically thank the entire cricut-DIVA design team for everything they have done and continue to do. They are one of the most absolutely wonderful, talented, kind-hearted, fabulous group of ladies I’ve ever had the pleasure of working with. Thank you so very much from the bottom of my heart!

Now, onto the design team call…..

Expectations:

Design Team members are expected to post once a month for a 6 month term. At the end of the term we can discuss whether you’d like to stay on or not.

Projects for posts MUST use the cricut and have an explanation of how it was made. You can look through past posts here to get a general idea of what CricutDIVA posts look like.

We use a calendar in yahoo for scheduling who posts when so members are asked to have a yahoo account (if you don’t have one you can open one).

The blog is hosted on wordpress so it is a given that all design team members must learn to use wordpress. Don’t let this scare you though. Most of our current design team had never used wordpress before and they all do just fine. I will personally help any member through any techology issues they may have with the postings and getting everything set up and familiarized.

We also use a facebook group for design team members to use as a forum of communication amongst us so a facebook account is necessary. If you are not someone who has a facebook account and don’t want a personal facebook  account it would be perfectly acceptable to open a ‘fake’ account with an alias (so long as we know it’s you) to access this private group for the design team.

How to apply:

To apply to be a CricutDIVA please use the contact form below to tell us about yourself and let us know you’re interested in applying.

If we think you might be a good fit for our team we will reply within a week of your application asking you to send a ‘mock’ post complete with photos of a never before seen project.

We will then go over all the applications and notify those chosen for the design team.


If accepted onto the design team your mock post can be used as your first post on the blog, or if you are not chosen for the design team you can post away on your personal blog once the accepted candidates names have been released. We will in no way take or use your submission without your permission to do so and your sending it in will be used solely for the purpose of application.

Please submit your application by filling in the form below. Be sure to tell us anything you think we should know about you in consideration for the team. 

Design Team Applications close as of October 31, 2013 at midnight. You may still take a chance and apply after this date however if there are a large number of applicants received prior, late applicants will not be reviewed.


I am leaving the call open-ended for the moment as I haven’t 100% decided how many new CricutDIVAs we will accept, this will solely depend on the the number of applicants and how well of a fit the applicants are. 


Decorated Metal

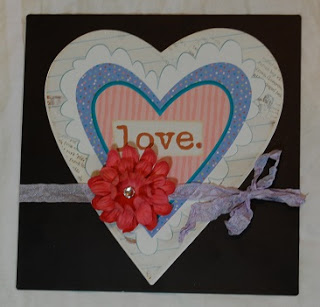
I am a DIVA today – a Cricut DIVA!!  I have a fun project to share with you using my Cricut Imagine and Square 1 Masterpiece Repositionable Fabric.
For information about this awesome product, or to order some for yourself just go HERE.
I used my Cricut Imagine and Imagine More Cards cartridge to print and cut out this heart image.  It is sized to 7.5 inches.
I put the 8 1/2 x 11 sheet landscape on my mat to fit the images.
I found these 8×8 metal wall decor pieces at Michaels in the Dollar Bins.  They are normally $2.00, but were 40% off – score!!!  I thought the image was permanent and I was prepared to sand and paint the metal, but these are stickers that peeled off pretty easily!
I peeled the heart off the paper backing and stuck it down.
The image is cute, but pretty flat so I grabbed some flowers and ribbon!!
I layered three flowers.  These are Recollections flowers from Michaels and come in two sizes.  I layered two large flowers on the bottom (one upside down) and a smaller one on top.  I fastened them together with a brad and put a rhinestone gem on top.
I tied some 3 Girl Jam crinkle ribbon around the metal piece.
Here is a great wall decor piece.  I tied the ribbon on and used a glue dot to adhere the flower to the ribbon.  This piece is totally temporary as you can remove the Square 1 fabric and change the look!!
You can find more of my work on my personal blog HERE.  Thanks for stopping by!

Froggie Gift Bag

Hi!!  Lori here from ScrappinMyStressAway with a fun gift bag.  I used my Cricut Imagine and Nursery Tail cartridge to make this cute gift bag for my friend’s baby boy!
I print and cut out the image at 5.5 inches and 2.5 inches.  I inked the edges with Vintage Photo distress ink.
I cut a brown mat and used some washi tape to make a side border.  I put two pieces of tape side by side.
I adhered the brown paper to a kraft gift bag.  I then adhered the frog image to the brown paper.
I cut a piece of kraft cardstock to 3×6 inches and folded it in half to make a gift tag.  I trimmed the brown paper to 2.75×2.75 inches and put one piece of washi tape on the side.  I adhered the paper to the front of the card, and the frog image on the paper.
I punched a hole at the top corner of the card (by the fold) and tied the gift card to the handle with some hemp cord.
Here is a super cute gift bag with matching gift tag!
You can see more of my projects on my BLOG!

Using the Chalkboard Font cartridge

001bg

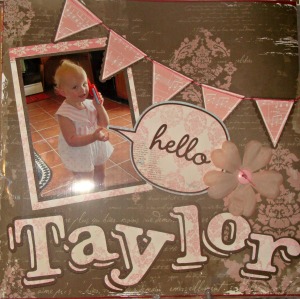
My design team post for this week features the new Cricut cartridge- Chalkboard Fonts. This is by far one of my new favorites for a font cartridge. I love the way the letters look like they are intricate but it’s a breeze to put together. I also used Pretty Pennants to make the banner and my Imagine with the Imagine More Cards cartridge for the Hello bubble. This page went together so easily with 2 double sided sheets of patterned paper, a Prima flower and some dark brown cardstock. I also used a white Signo uniball pen to outline the pennant to give it some pop. I used some embroidery floss to sew the banner onto the paper. An added layer was to use foam squares to pop the letters off the paper. With the layered letters, it really added some oomph!
Thanks for looking! For more of my designs you can find me at http://theseareafewofmyfavoritethings-beth.blogspot.com/

Yummy Note Card Set

cricutDIVA image
Hi!!  Lori here from ScrappinMyStressAway and I am super excited to share this Yummy note card set today at CricutDIVA!!
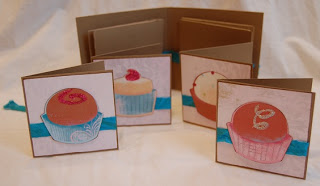
I made a set of 3×3 cards with truffles on them from the Cricut Imagine Yummy Cartridge.
I printed out the light pink distressed-look pattern on white cardstock to use as background paper for my cards.  I cut them to 2 7/8″ squares and adhered them to my note card (3×6 folded in half).
I printed and cut out the three truffles and mini cake at 2″ each.  I inked the edges in Vintage Photo ink, and added a little stickles to each piece and let dry.
Before I adhered the patterned paper to the card, I wrapped a piece of 3Girl Jam 1/3 the way up the paper.  I chose the blue to bring out the bit of blue in each card.
I got the We R Memory Keepers Envelope Punch – super cool new toy!!!  I wanted to make envelopes for my little note cards.
Making the envelopes were fun, once I watched a YubeVideo on how!!
I found this Enveolope Gum at Archivers to seal the envelopes.  I just painted the glue on and let it dry.  It just needs a little water to seal.
I made a little folder to keep the card set in – this makes a great gift idea!!
I started with a piece of Kraft cardstock and cut it to 8 1/2″ x 6″.  Placing the paper horizontally on my Score Board, I scored 2″ up from the bottom to create the pocket.
I turned the paper to score the fold lines.  I scored at 4 1/8″ and 4 3/8″.
I used my ATG gun to adhere the center of the bottom flap (pocket) to the spine of the folder.
I punched a hole on each side of the pocket.  I ran a piece of 3Girl Jam ribbon across the inside of the folder and used a glue dot in the spine to hold the ribbon down.
When you close the folder, simply tie a pretty bow.
What a Yummy Gift card set!  These are great for teachers, friends or even secret pals.  I included this set in an Easter Swap gift with another paper crafter!
You can find more of my work on my personal blog HERE.

Sentimental Saturday- Mother’s Day Card

029

I’m what I would call a novice card maker. I have always made simple cards for family, but up until Christmas, I hadn’t really tackled making more detailed cards and actually sending them to friends. In September, I decided to get back into scrapbooking, and after being out of the loop for a couple of years, it didn’t take me long to discover that a lot of new things had been coming out! I bought an Imagine as an impulse buy from ebay, because I was intrigued at the thought of a machine that would print and cut. I haven’t ever regretted that purchase! With the Imagine I decided that my cards had a personal touch while also looking (almost) professional!

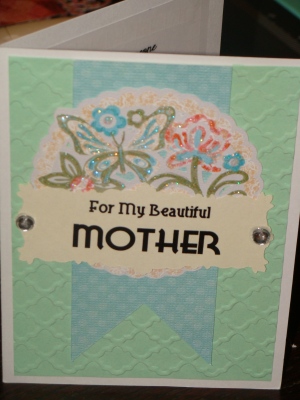
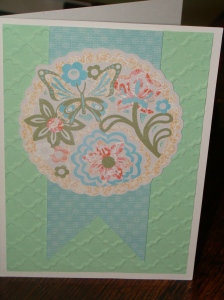
This card is a great example of mixing the Imagine with the Expression 2 to put together a card in less time than it would take to drive to the store and get one! If you don’t have an Imagine, then a cardstock die cut would certainly work!
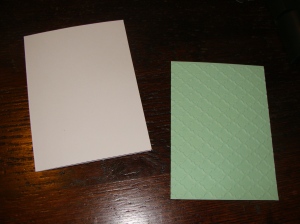
To start I chose a pre made A2 card and then cut a soft green sized a little smaller than the front of the card. I ran it through my Cuttlebug with an embossing folder from The Paper Studio and attached it.

015

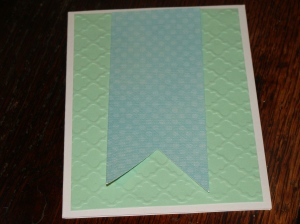
The “cut it free for a week” from the Craft Room is Love Mini Books and I found the banner that I cut in a sort blue at 3 1/2 inches and attached that onto the green background.

020

I used my Imagine and the Lori’s Garden cartridge for the die that is placed on the banner. I sized it at 3 inches.

021

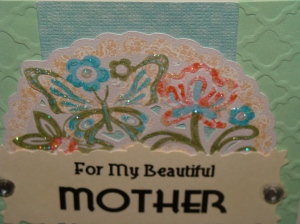
Using a Word document I went in and played with fonts until I found what I liked for the front. It’s a mix of 2 fonts. For My Beautiful is Blue Plate Special and Mother is Lake Woebegon. I printed a sample to use as a template and then I went back into the Craft Room and found a banner from the Bloom cartridge. I sized it at 3 1/2w x 1 1/2h. After cutting it I used some tabs to attach it to the printed template and ran it back through the printer, to get it printed on my cut shape.

027

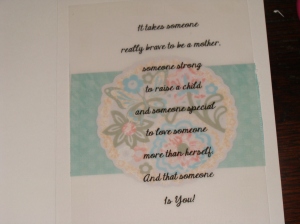
Before finishing the front, I went to work on the inside. The Internet is a Godsend for finding quotes and poems quickly! I typed Mother’s Day quotes into my search engine and browsed until I found this one. I copied it into a word document and played with spacing and fonts until I was happy with the way it looked. I then printed it on vellum. Under the vellum I attached a blue strip like the one on the front and another die cut that was sized at 2 1/2 inches. It gives the inside just a little bit of color!

030

I then took some Stardust Stickles and lightly traced around the flowers and butterfly to give it some sparkle. I also used 2 rhinestones and placed them on the banner to make it look attached to the card.
You can find more of my work at my blog
http://theseareafewofmyfavoritethings-beth.blogspot.com/
Thanks for looking and I hope you enjoy my card! Enjoy your Saturday and be sure to make some memories along the way!